In this blog article you will learn how to save and export various elements in Gig Performer, load and import them, and create a backup of your important files and the whole computer.
The term “element” may refer to your panel, rackspace, song, widget curve, rig as well as other items that will be listed below. For more information, make sure to check out useful user manual pages and other blog articles that will be linked by this article.
[ 1 ] What can you save in Gig Performer
.
We’ll start with Gig Performer’s project files that are called gig files or simply “gigs”. Refer to this page to learn about the basic terminology in Gig Performer.
How to save a gig file
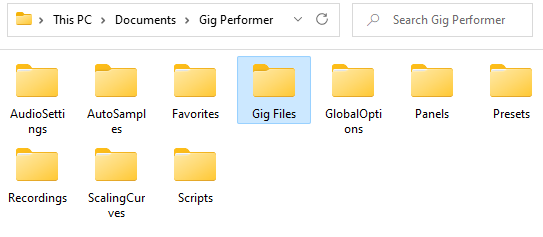
You normally save and open gig files using the corresponding menu items in the File menu or via their respective keyboard shortcuts (see this page to see all keyboard shortcuts). You can save gig files under any folder you want, but for better organization, we recommend that you don’t have them scattered on various places on your disk, and instead have a centralized location, along with meaningful file names and subfolders. That location can be, for example, a subfolder (for example: “Gig Files”) in the default folder where Gig Performer content is located; click Window -> Open Content Folder to open this folder.
Note: all Gig Performer versions have the same file extension for gig files – “.gig”. (click here to learn about file extensions in Gig Performer) If you recently upgraded from an older version of Gig Performer, we recommend that you backup your gig files created with an earlier version to another location, as saving a gig file with a more recent version of Gig Performer will make it incompatible with older versions of Gig Performer.
How to save the current rackspace only
When you save a gig file, all rackspaces are saved, but there is a feature to save just the current rackspace back into the gig file without saving other possibly changed rackspaces. To do this, click on the Update (save) Rackspace to Gig File menu item from this contextual menu. Important note: make sure to save a gig first for this feature to work. Also note that you cannot add and save new rackspaces this way – the rackspace must already exist and must be saved to the gig file first (you cannot add a new rackspace and then select this menu item to update it because it is not yet in the gig file).
How to save and load panels
In the Panels view Edit mode, you can save and load panels.
Click on this in-depth article to learn about designing your panels or load panels that come bundled in Gig Performer, and on this user manual page to learn how to save and load panels.
How to save and load scaling curves
The scaling curve mechanism in Gig Performer 4 replaced the older linear-only scaling that was available in previous versions of Gig Performer. Scaling curves can be associated with widgets, Note Velocity values of MIDI In blocks, and the Probabilistic Sound Designer where the scaling curves actually represent probabilities. If you have created a specific curve that you want to re-use, like in this community thread:
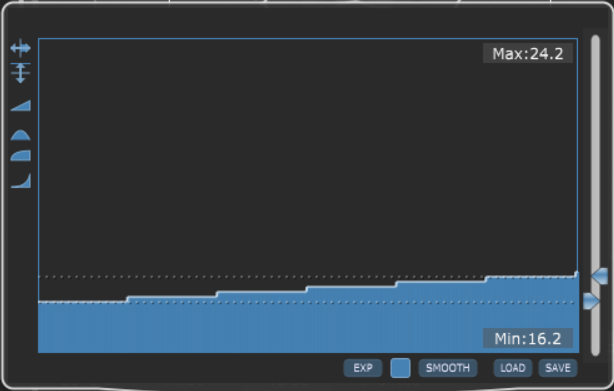
… you can easily save the curve and load it when necessary. Click here to learn more.
How to save and load favorites
Gig Performer enables you to select one or more plugin blocks and save that selection as a favorite.
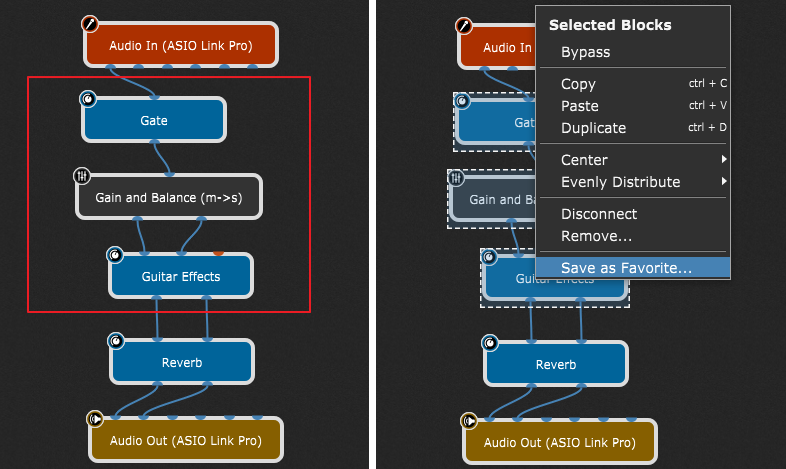
To learn how to save and insert a favorite, click on this manual page or this YouTube video.
How to save and load presets
Some plugins include predefined presets, most commonly factory presets.
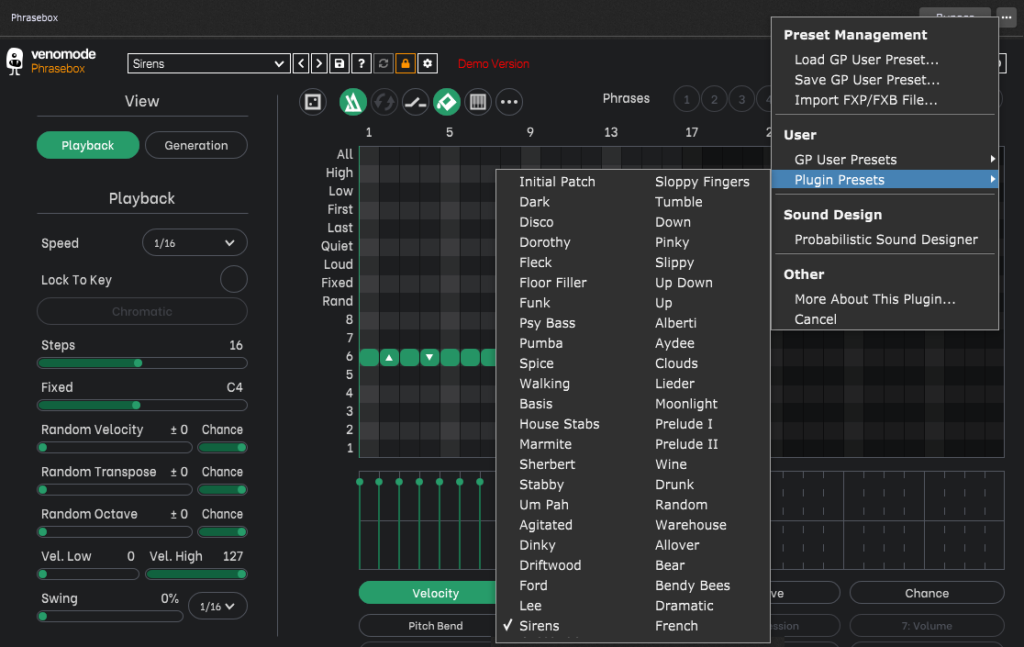
Gig Performer allows you to save your own custom User presets and to load them easily. If the plugin supports older FXP/FXB files, you can import them as well. Click on this link to learn more.
How to save and load the Probabilistic Sound Designer configuration
The Probabilistic Sound Designer is a great feature of Gig Performer that allows you to randomize selected plugin parameters values and generate random but sonically related patches.
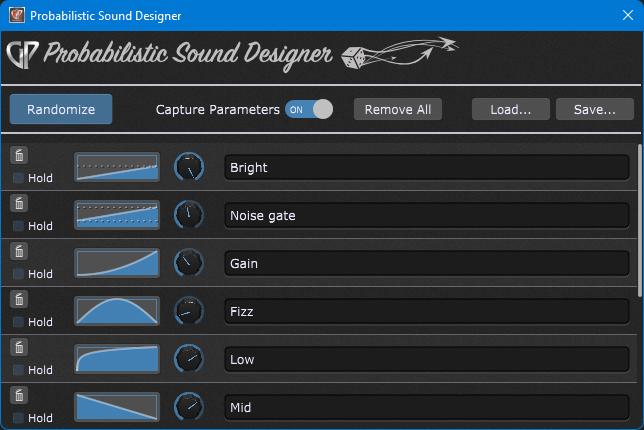
Click on this YouTube video to see this feature in action with Cherry Audio GX80 and click on this link for more information on saving and loading the the desired configuration.
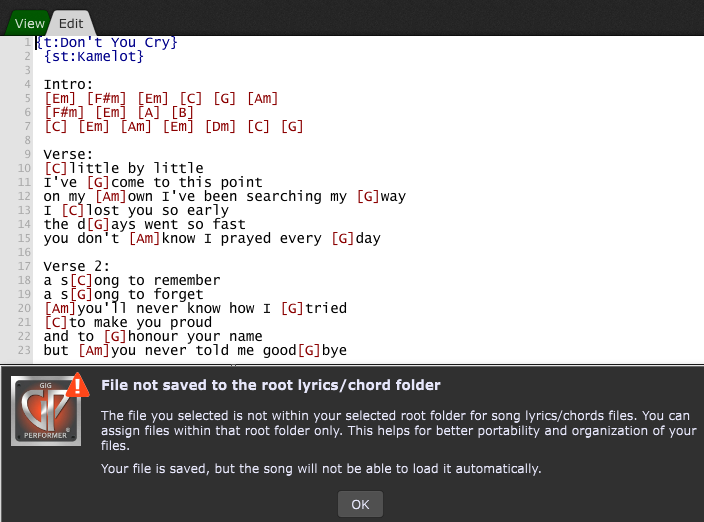
How to save ChordPro files
Gig Performer has ChordPro support. You can easily create your own ChordPro files or find them on the Internet (click here to learn how). Although you can save ChordPro files anywhere you like, if you want to assign a ChordPro file to a song, it must be saved in the so called “root folder”, and the dialog will warn you if you try to save outside of that “root folder”:
Click here to learn about the root folder and how to save and load a ChordPro file.
How to save and load Gig Performer Scriptlets and scripts
First, check out this comprehensive list of all Scriptlets available in the Gig Performer Community. For example, take a look at the CC and PC Incrementer Scriptlet:
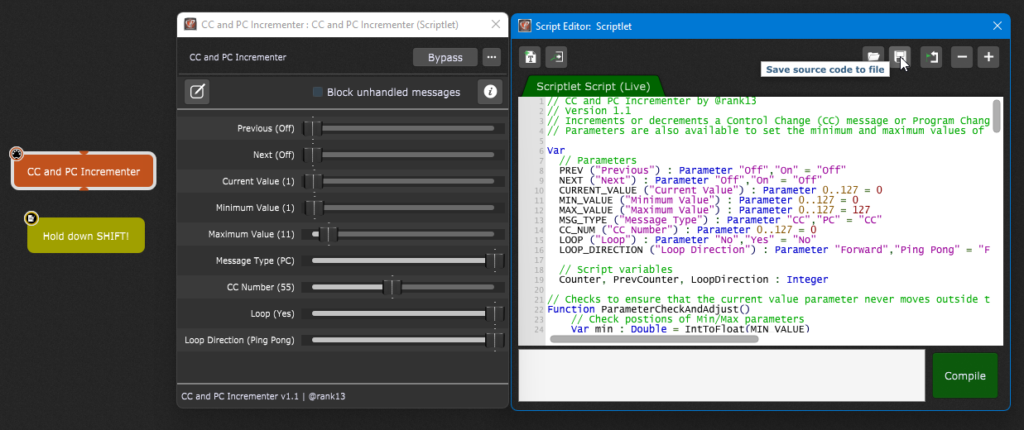
Download this gig file, open it and navigate to the Wiring view. Hold the Shift key down and double click on the Scriptlet to open both the Scriptlets plugin window and its Script editor (click here to learn more about the magic of the Shift key).
To reuse this scriptlet in another gig file you can:
a) Copy the code and paste it into the Script editor of another scriptlet,
b) Save the scriptlet as a favorite and simply insert it where you desire.
Rank13, the author of this scriptlet, also provided a favorite file for this scriptlet (check out the Bonus section) which you can download and simply drag ‘n’ drop it directly onto the Gig Performer window (this technique will be discussed in the next chapter).
You can also save the source code of the script to a file as indicated with the pointer on the screenshot above. You can load the saved script where desired. This applies to all script editors.
[ 2 ] What can you export in Gig Performer
.
Many elements can be exported in Gig Performer. Some exported files can then be easily dragged onto the Gig Performer’s window and drop them to import them (the “drag ‘n’ drop” technique).

The following file types are supported:
– Gig files,
– Rackspace files,
– Song files,
– User plugin presets,
– Favorites.
Simply click on a supported file and while holding down the mouse button, drag the file into the Gig Performer window. Depending on the file type, one of the four screens above will appear.
How to export a rackspace
To export the selected rackspace or all rackspaces in a gig file, click on File -> Export Selected Rackspace… or File -> Export All Rackspaces… respectively. NB: for the Global rackspace, this menu item is called Export Global Rackspace…
Note: an option to export the selected rackspace is also available in this menu.
How to export a song
First make sure that you are in the Setlist view. To export the selected song or all songs in a setlist, click on File -> Selected Song… or File -> Export All Setlist Songs to a Folder… respectively.
Note: these menu items are also available in this menu.
How to export rigs in the Rig Manager
The Rig Manager window (Window -> Rig Manager) allows you to easily export and import your rigs. Click here to learn how. If you haven’t used the Rig Manager before, this video will get you started.
How to export Audio Settings
When you click Options -> Audio Setup, you can find two buttons to export/import audio settings. Click here to learn more.
How to export all Gig Performer options
You can easily export and impot all Gig Performer options by clicking on the Options menu and then on Export All Options… and Import All Options… menu items respectively.
Note: the exported file stores not only all options in the Options screens, but also all global settings including global MIDI assignments, and the entire Rig Manager setup.
How to export list of plugins in the Plugin Manager
The Plugin Manager allows you to copy the selected plugins from the list to the clipboard in CSV format. Afterwards, simply paste the clipboard contents into a (say) spreadsheet application to create a nicely formatted list of validated plugins on your computer.
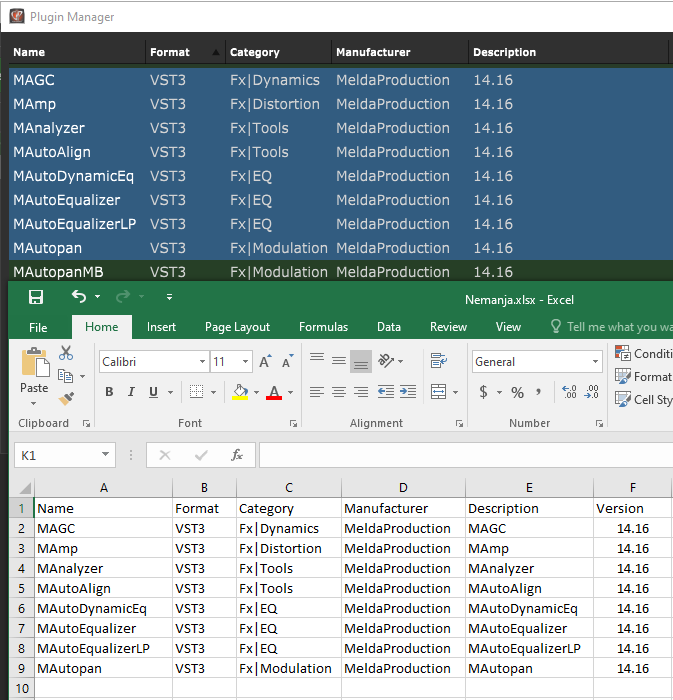
Click here to learn more.
[ 3 ] How to create a backup
.
The best practice is to always create backups of your files and your computer.
This way you have protected your important files from a disk failure, malware issues or accidental deletion or damage. Additionally, unintended automatic operating system updates, plugin updates (or any software update in general) can cause undesired computer behavior and affect your gig.
Therefore, when you are happy with your gig file, create or save a copy of it. Indeed, even while you are creating your gig file, you should save copies, perhaps with different numbers, so that you can easily revert back to an earlier version if necessary.
If you have optimized your PC or optimized your Mac for your gigs and feel confident that it’s ready to perform live? Create the full computer backup.
Can I just copy and paste Gig Performer related files to another disk
Yes, you can copy and paste files to your external hard drive or a cloud drive. Besides these Gig Performer file locations documented in the user manual, you should pay attention on several other locations that you may want to back up:
– where you stored your audio and MIDI files, necessary for Audio File Player and the MIDI File Player respectively?
– Gig Performer v4.7 and later allow you to use third-party fonts in your gig files. If you used any third-party fonts in your gig files, make sure to these fonts.
– if you use custom sounds for the Gig Performer Metronome, what is their location?
– where do you keep your samples?
– keep track of your custom paths, if you changed Gig Performer’s default locations, for example Gig Performer’s Recordings location or the Root folder for storing ChordPro files.
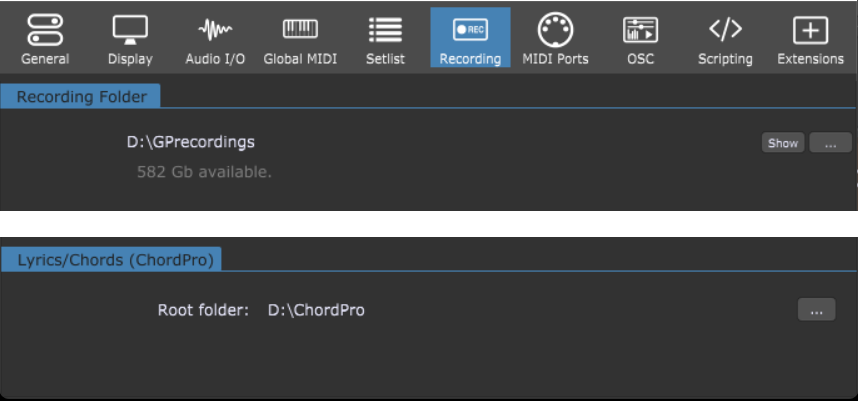
Important note: Gig Performer v4.7 and later include a dedicated Locations tab in the Gig Performer options where you can set some default folder locations. Click here to learn more. The screenshots above apply to Gig Performer v4.5.
NB: My personal practice is to store audio and MIDI files under the root of a system drive, e.g. C:\AudioFiles and C:\MidiFiles (or another drive), so that the path is independent of the user name (e.g. C:\Users\Nemanja\Documents\ …).
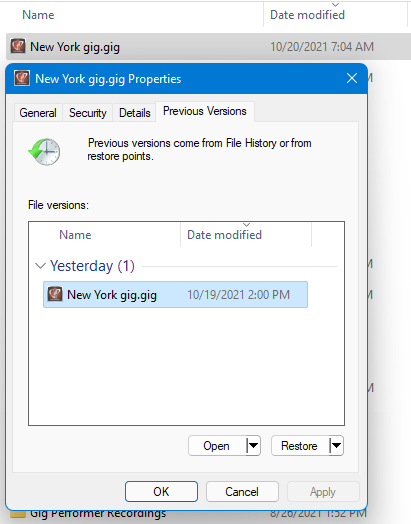
How to revert to a different version of your gig and other files
Mac users can use Time Machine. PC users can use File History, for which we have guidelines here.
How to create the complete backup of your computer
Mac users can use either Time Machine or a 3rd party solution, such as CCC (Carbon Copy Copier, mentioned in this blog). Windows Users will use this built-in feature or use a 3rd party solution (one of them you can find in one of Backstage with Performer episodes).
If you want to migrate your gig files from once platform to another, for example PC –> Mac or vice versa, or you want to use your gig files cross-platform, this blog article will help you with your journey.
If you have any questions or you want to share your feedback, please visit this Community thread.
.
Share this article it to support Gig Performer and spread the word! 
Own The Stage® with Gig Performer®
Nemanja Pudar
