Thank you for your interest in Gig Performer Essentials.
Please enter your name and email address in the field below. Links for both Windows and macOS downloads will be sent to you.
By providing your email address, you will be subscribed to our newsletter from which you will be able to unsubscribe at any time. Make sure you use a valid e-mail address and if you don't receive our e-mail, please check your spam folder.
Dialog window
Gig Performer® 14-Day Free Trial
Thank you for your interest in Gig Performer.
Please enter your name and email address in the field below. Links for both Windows and macOS downloads will be sent to you.
By providing your email address, you will be subscribed to our newsletter from which you will be able to unsubscribe at any time. Make sure you use a valid e-mail address and if you don't receive our e-mail, please check your spam folder.
We still see Gig Performer 3 and even Gig Performer 2 users contacting us through our support channels. Most of them are looking for the upgrade options. In this article we want to share with you key reasons to upgrade to Gig Performer 4, answer frequently asked questions regarding the upgrade process, and indicate key benefits to your existing Gig Performer 3 setup.
Update: the most recent version of Gig Performer is Gig Performer v5. It includes significant updates to Gig Performer v4.
We released Gig Performer 4 on 1st June, 2021, with the build number v4.0.51. In terms of version numbers, it may have looked like that jump from then current Gig Performer v3.8.1 to Gig Performer v.4.0.51 was not significant. However, the very first Gig Performer 4 reviews recognized plethora of new features in Gig Performer 4. Examples are 49 Billion Enhancements from Synth and Software and The Biggest Upgrade Ever from MusicPlayers.
The latest Gig Performer release v4.8.2 includes even more features and updates. Check out the Release Notes page or announcements in the Community forums.
If you are on the fence and looking at what Gig Performer 4 has to offer, we want to speed up that decision. Here are the key reasons to upgrade. We’ll cover all the features with instructional videos and/or blog articles.
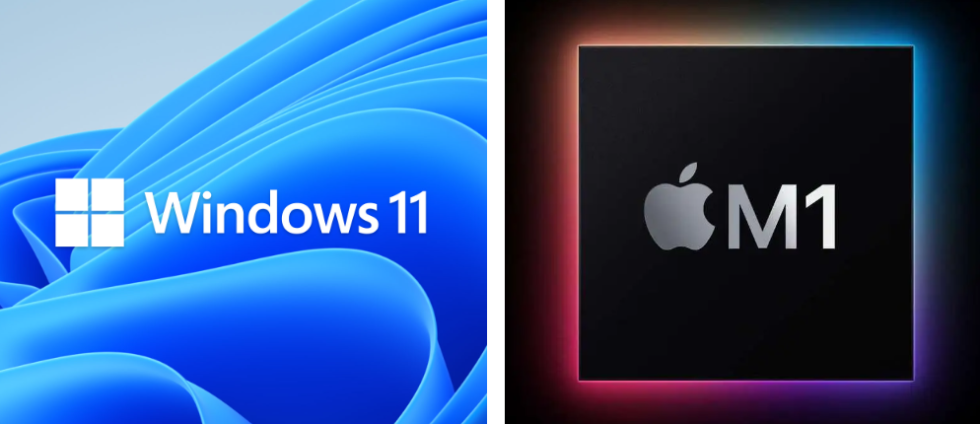
1. Full support on modern operating systems
.
First, Gig Performer 3 is not officially supported on Windows 11. Further, there are no Apple Silicon-native builds for Gig Performer 3. Gig Performer 4 adds support for Windows 11 and is available natively for Apple Silicon (new M1 and M2 chips).
To learn more about these new chips or cross-platform usage in Gig Performer, please see this blog article.
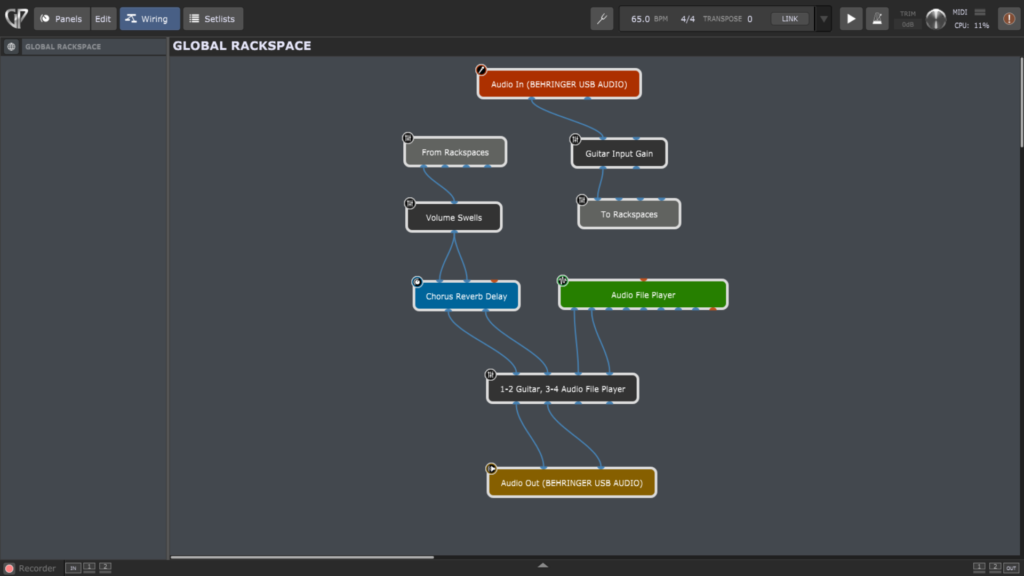
2. The Global Rackspace
.
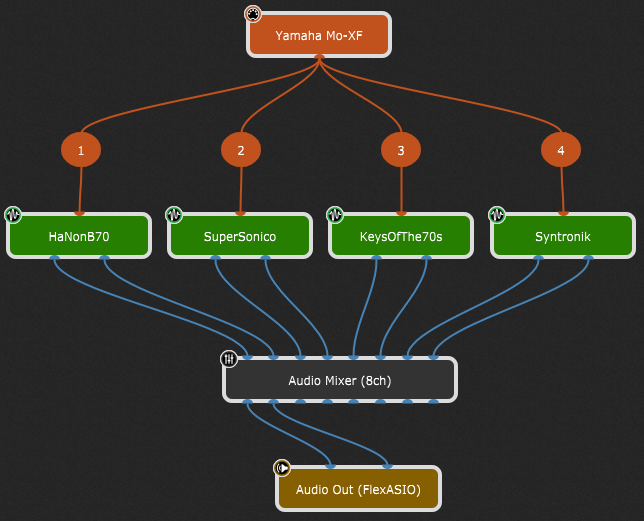
The Global rackspace is a special rackspace that allows sharing audio plugins with regular rackspaces. From now on, we’ll call these “rackspaces”. The Global rackspace is always active. The key benefit here is that you can, create global effects. For example, a common reverb, delay, or chorus, instead of creating them in individual rackspaces. You can send audio from the currently active rackspace to the Global rackspace for processing and vice versa. You can of course also insert an Audio File Player that will play backing tracks globally available. Or you can add regular synth plugins along with MIDI In blocks to the Global rackspace. You can have a piano or organ that is always available. The Global rackspace is also the best way to use a guitar looper plugin. In this case, it stays active continuously as you switch rackspaces to change your guitar sounds on the fly.
.
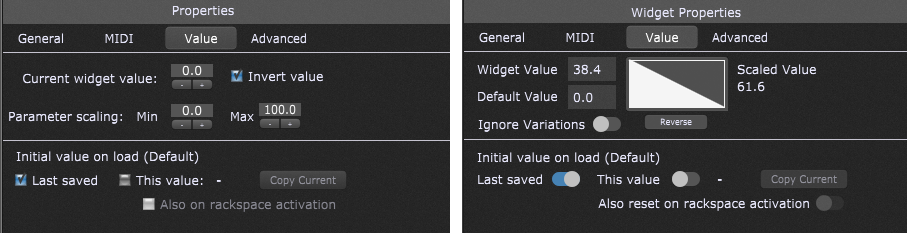
While Gig Performer 3 offered only linear scaling, Gig Performer 4 introduced a new scaling component. By defining your own curves, you can create complex mappings between actual widget values and the corresponding scaled values sent to plugin parameters:
Besides the widget scaling, you can use this scaling component for velocity scaling in MIDI In blocks and for defining parameter randomization ranges in the Probabilistic Sound Designer. Click here to learn how to create velocity splits.
.
There are very significant improvements in usability and overall user experience. This allows you to optimize your workflow and use your time more efficiently. You can save your plugins and their connections as Favorites and easily reuse them (click on this video to learn more). You can scroll the Wiring view surface to manage views larger than your physical screen. Its is zoomable, allowing you to organize your plugins better (click on this video to learn how). You can select and copy or move multiple blocks simultaneously. You can quickly load gig files, rackspaces songs, user plugin presets, and favorites using the Drag ‘n’ Drop technique:
Dragging a user plugin preset into Gig Performer will also create the necessary plugin instance so you don’t even need to remember which plugin you used to create a preset. Also favorites and user presets will appear in popup menus and the Quick Plugin Finder making it even quicker for you to find items you use often.
If your monitor is farther from your location on stage, you can customize Gig Performer’s features for that scenario. For example, you can make various elements in Gig Performer bigger and the Tuner view elements are bigger and optimized for live use.
As for the panels and widgets design, all recently added features are described in this article, such as hiding widgets and dragging a widget between panels. An Undo feature is also available for widget-related operations, i.e. widget reposition and widget duplication. All new widgets are listed here.
Many useful usability tips and tricks are described in the article The Magic of the Shift key, such as a feature to quickly insert plugin blocks into an audio or MIDI path (click on this video to learn more).
5. New extremely useful internal plugins
A powerful new Auto Sampler feature allows users to create a set of samples from individual or interconnected plugins that, if used together, might demand too much CPU to be practical for live performance. External synths can also be sampled with added plugin effects, eliminating the need to bring those heavy synths to a show.
Another cool feature is the Streaming Audio File Player, which allows you to have thousands of audio files in your gig — they are all streamed from your disk. It supports multiple audio formats, including MP3, WAV, OGG, and FLAC, enables users to seamlessly integrate thousands of songs into their gig files, shattering the limits on backing tracks while preserving precious RAM resources.
Other useful bundled plugins include the MIDI Channel Constrainer block (blog, video) or the System Actions block (blog, video):
Beside its usual functionality to play MIDI files, the bundled MIDI File Player plugin can be used to automate switching of rackspace variations or song parts (click here to learn more).
Note: With permission from several plugin developers, we have also bundled a few synths from LostIn70s and Overloud Essentials to help you get started using our built-in templates.
6. MIDI Helper Tool
.
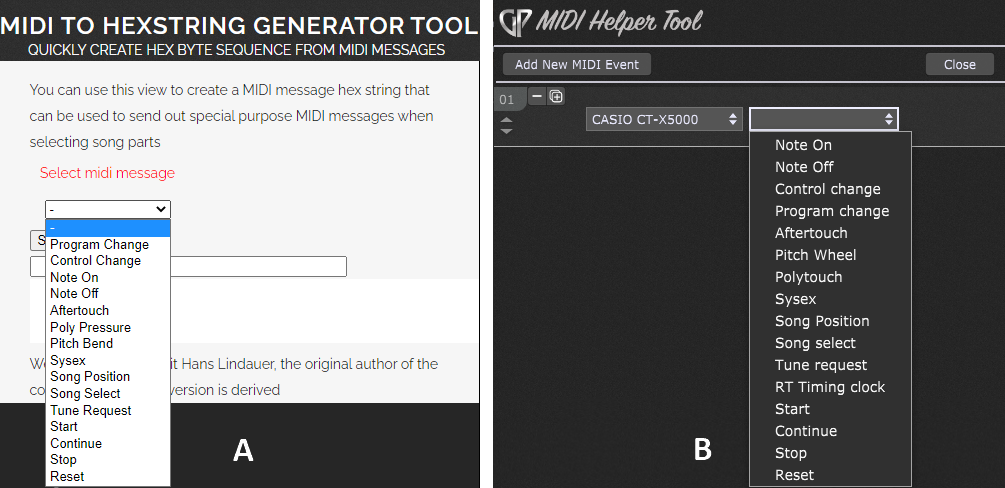
The Song Part Properties dialog in Gig Performer 3 included the ability to create a MIDI message hex string. You could create special purpose MIDI messages to be sent out when selecting song parts. However, you had to click on the Open helper tool link and be connected to the Internet if you wanted to use the online MIDI to Hexstring Generator Tool which was hosted on the Gig Performer website. In Gig Performer 4 this mechanism has been replaced by the new built-in MIDI Helper Tool:
Above you can see a comparison between the online tool (A) and the MIDI Helper Tool (B). For the latter, an Internet connection is not needed. Click here to learn more.
7. Revamped Recorder
.
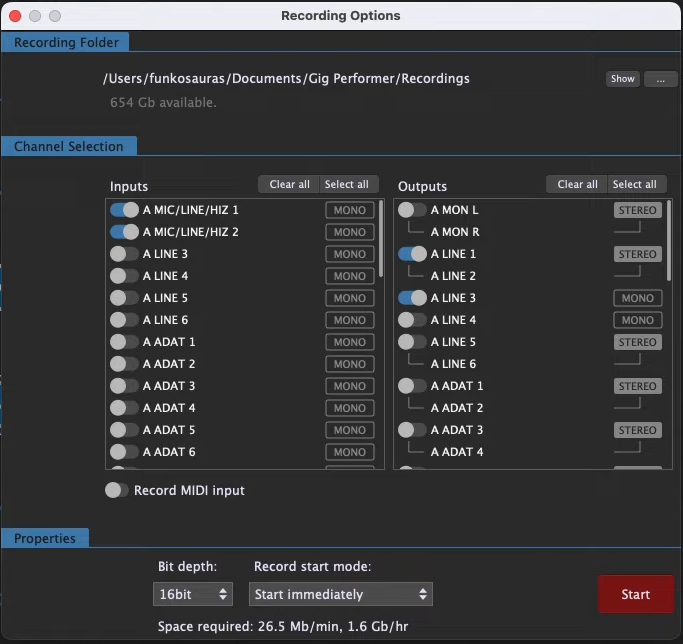
The latest update of Gig Performer 4 includes a built-in recording feature that allows you to capture not only audio arriving at your audio interface’s inputs, before it has passed through any of the plugins, but can also capture your processed sounds at the output stage (in mono and/or stereo) as well as all incoming MIDI messages. In Gig Performer 3 you could only record raw inputs in mono.
.
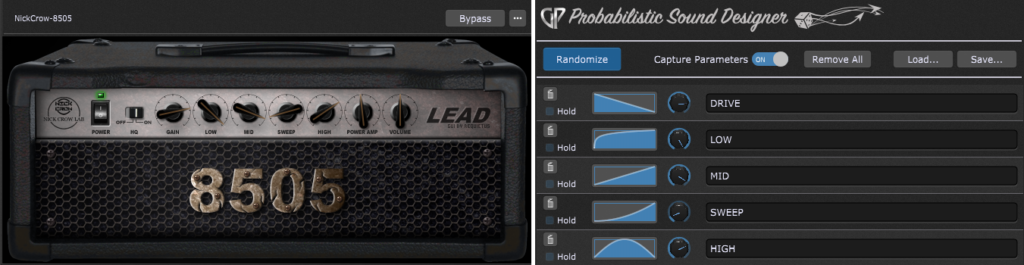
The somewhat hidden Random Parameter Generator in GP v3 has evolved into the brand new Probabilistic Sound Designer in GP v4:
The Probabilistic Sound Designer allows you to design random but related sounds by randomizing selected values of plugin parameters and using probabilities to determine how each parameter can be varied. Check out this video to get familiar with this feature and see its benefits.
9. Gig Performer extensions and External API
.
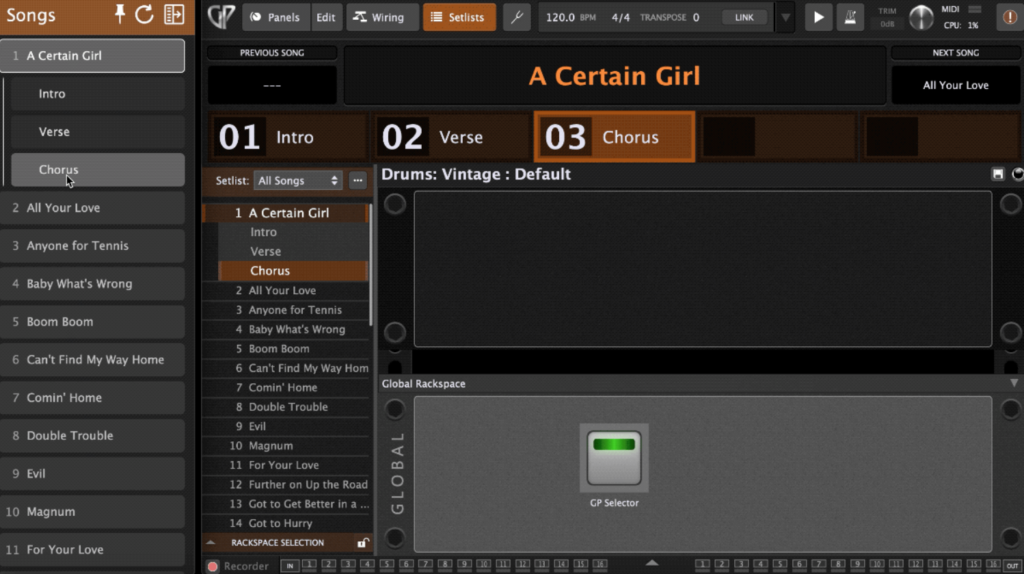
Extensions are basically libraries independently developed that Gig Performer can load to provide additional functionality. For example, additional support for a hardware device, some new GUI functionality or even additional GPScript functions. For the first, an extension would make your hardware device usable directly from within Gig Performer as if it was already built-in. An extension example is the Gig Performer Selector:
This user developed extension is freely available and users have reported that it is rock solid in live use (see this thread). Check out this blog article to learn more about extensions.
If you own a Stream Deck device, we now have an extension for it! Check out this dedicated blog article to learn more.
10. Advanced features
.
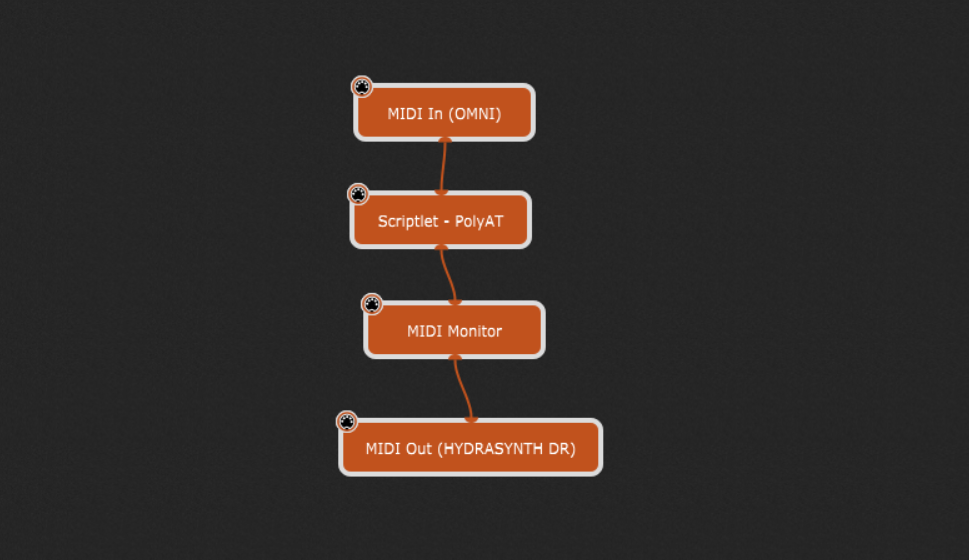
For very advanced use cases, Gig Performer provides you with new GPScript functions and OSC callbacks, Scriptlets, as well as the new LocalGP Port. For example, suppose you don’t have a keyboard with Poly Aftertouch. In this case, the scriptlet inside this gig file will provide you with similar functionality that’s almost as good as the real thing:
OSC users will also find lots of flexibility in Gig Performer with the MIDI In OSC Patchbay and Widget Direct Addressable OSC. Visit this user manual page to learn more.
Of course, the list can go on and on until we mention all 49 Billion enhancements! We could, for example, mention Song Lyrics window and ChordPro improvements, such as automatic lyric scrolling to the corresponding song parts or the PDFToGPChordPro tool (click here to learn more).
Or we could mention various widget-related features such as Follow Hardware, relative CC modes support, Radio Buttons, MIDI Thru (click here to learn more), or better Program Change Management.
Gig Performer 4 can normally open Gig Performer 3 gig files. NB: make sure to see a couple of breaking changes in this user manual page.
We use cookies to ensure that we give you the best experience on our website. If you continue to use this site we will assume that you are happy with it.